Lemons Control Panel Instruction
Detailed information on how to manage the information on your website
Today, in the conditions of fierce competition, it is difficult to search and even more difficult to find exactly what you really need. That is why we think that at any stage we need you! We need you because in a competitive environment, with sophisticated and correct business decisions, you can present and establish your own brand in the online space. We will introduce you to our working style and principles, and this will make it easier for you to make a choice. After that, you will know exactly what you will get by working with us.
Become a Lemonsian!
- Created: 5/26/2021
- Author: Lemons.ge
- E-mail: info @ lemons.ge
- Phone: 0 32 245 01 01
Opportunities
- Easy-to-navigate UI
- Manage pages
- News management
- Any word changes
- Managing website SEO
- Individual page SEO
- Contact information management
- Google integration
- Facebook integration
- Manage menu items
- Manage site languages
- Managing FAQ
- Managing team members
- Service management
- Catalog management
- Manage photos
- File management
- Simple text editor
- Subscribers
- And many more...
Options
Server requirements
- Apache with PHP and MySQL server
- PHP v8.1
- MySql
- CURL enabled
- Latest OpenSSL installed
- date.timezone setting enabled
Site Security:
- SQL injection protection
- CSRF (cross site request forgery)
- Cross site Scripting
- Cross site Direct Object References
- File Disclosur
- Remote File Inclusion
- Code Injection
- Directory Traversal
Pages
You can create any type of page that already exists in the design.
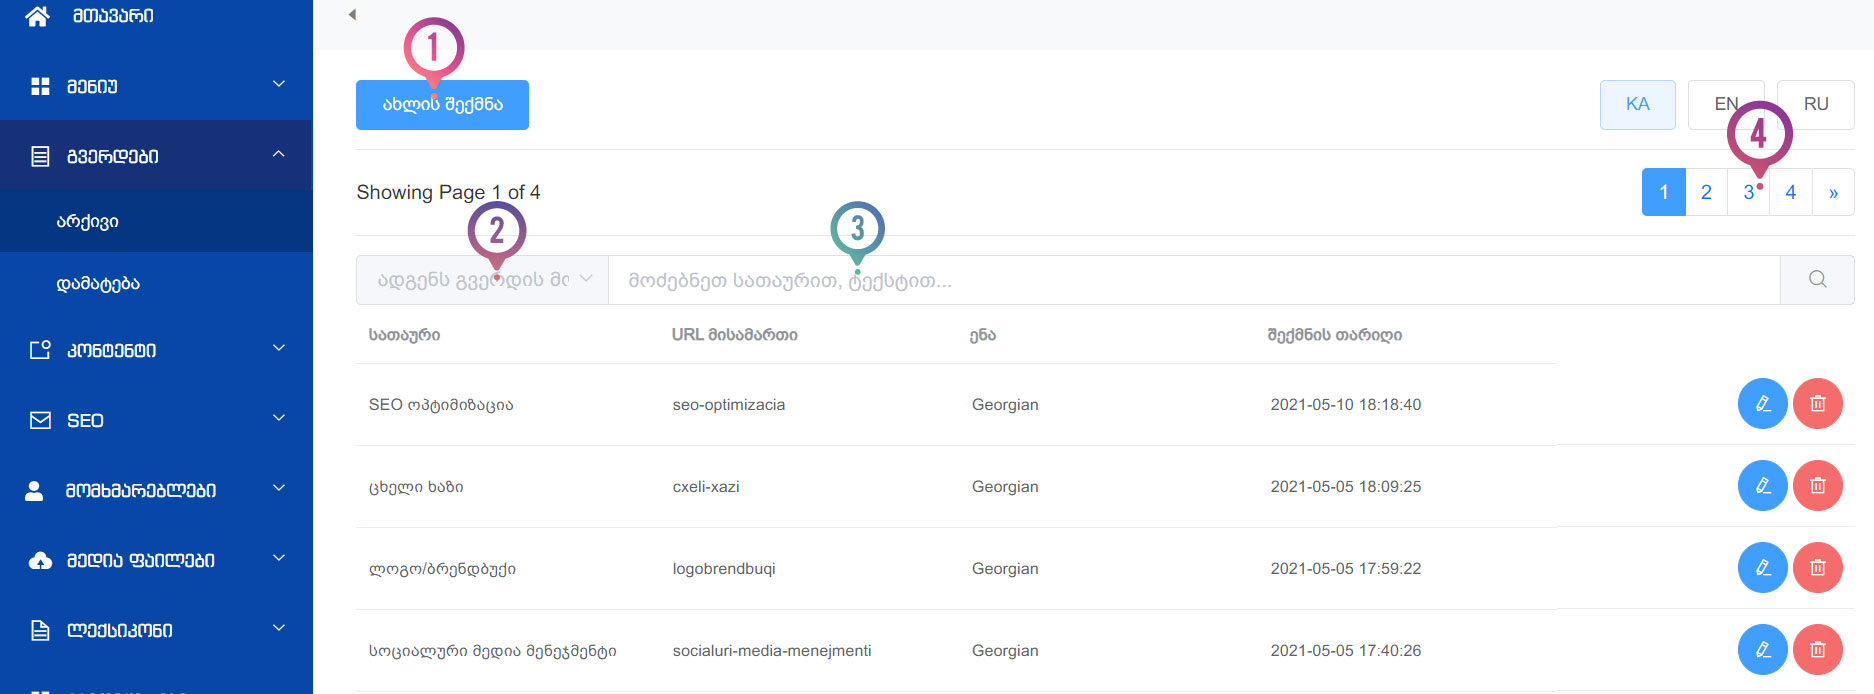
List of existing pages
- To create a new page, click the "Create New" button..
- It is possible to filter pages by their type, for example: text, team, news, etc.
- Enter the name of the page you are looking for for easy filtering.
- Each page displays only 10 items (in this case, a page), so to see other content, use pagination.
Add page
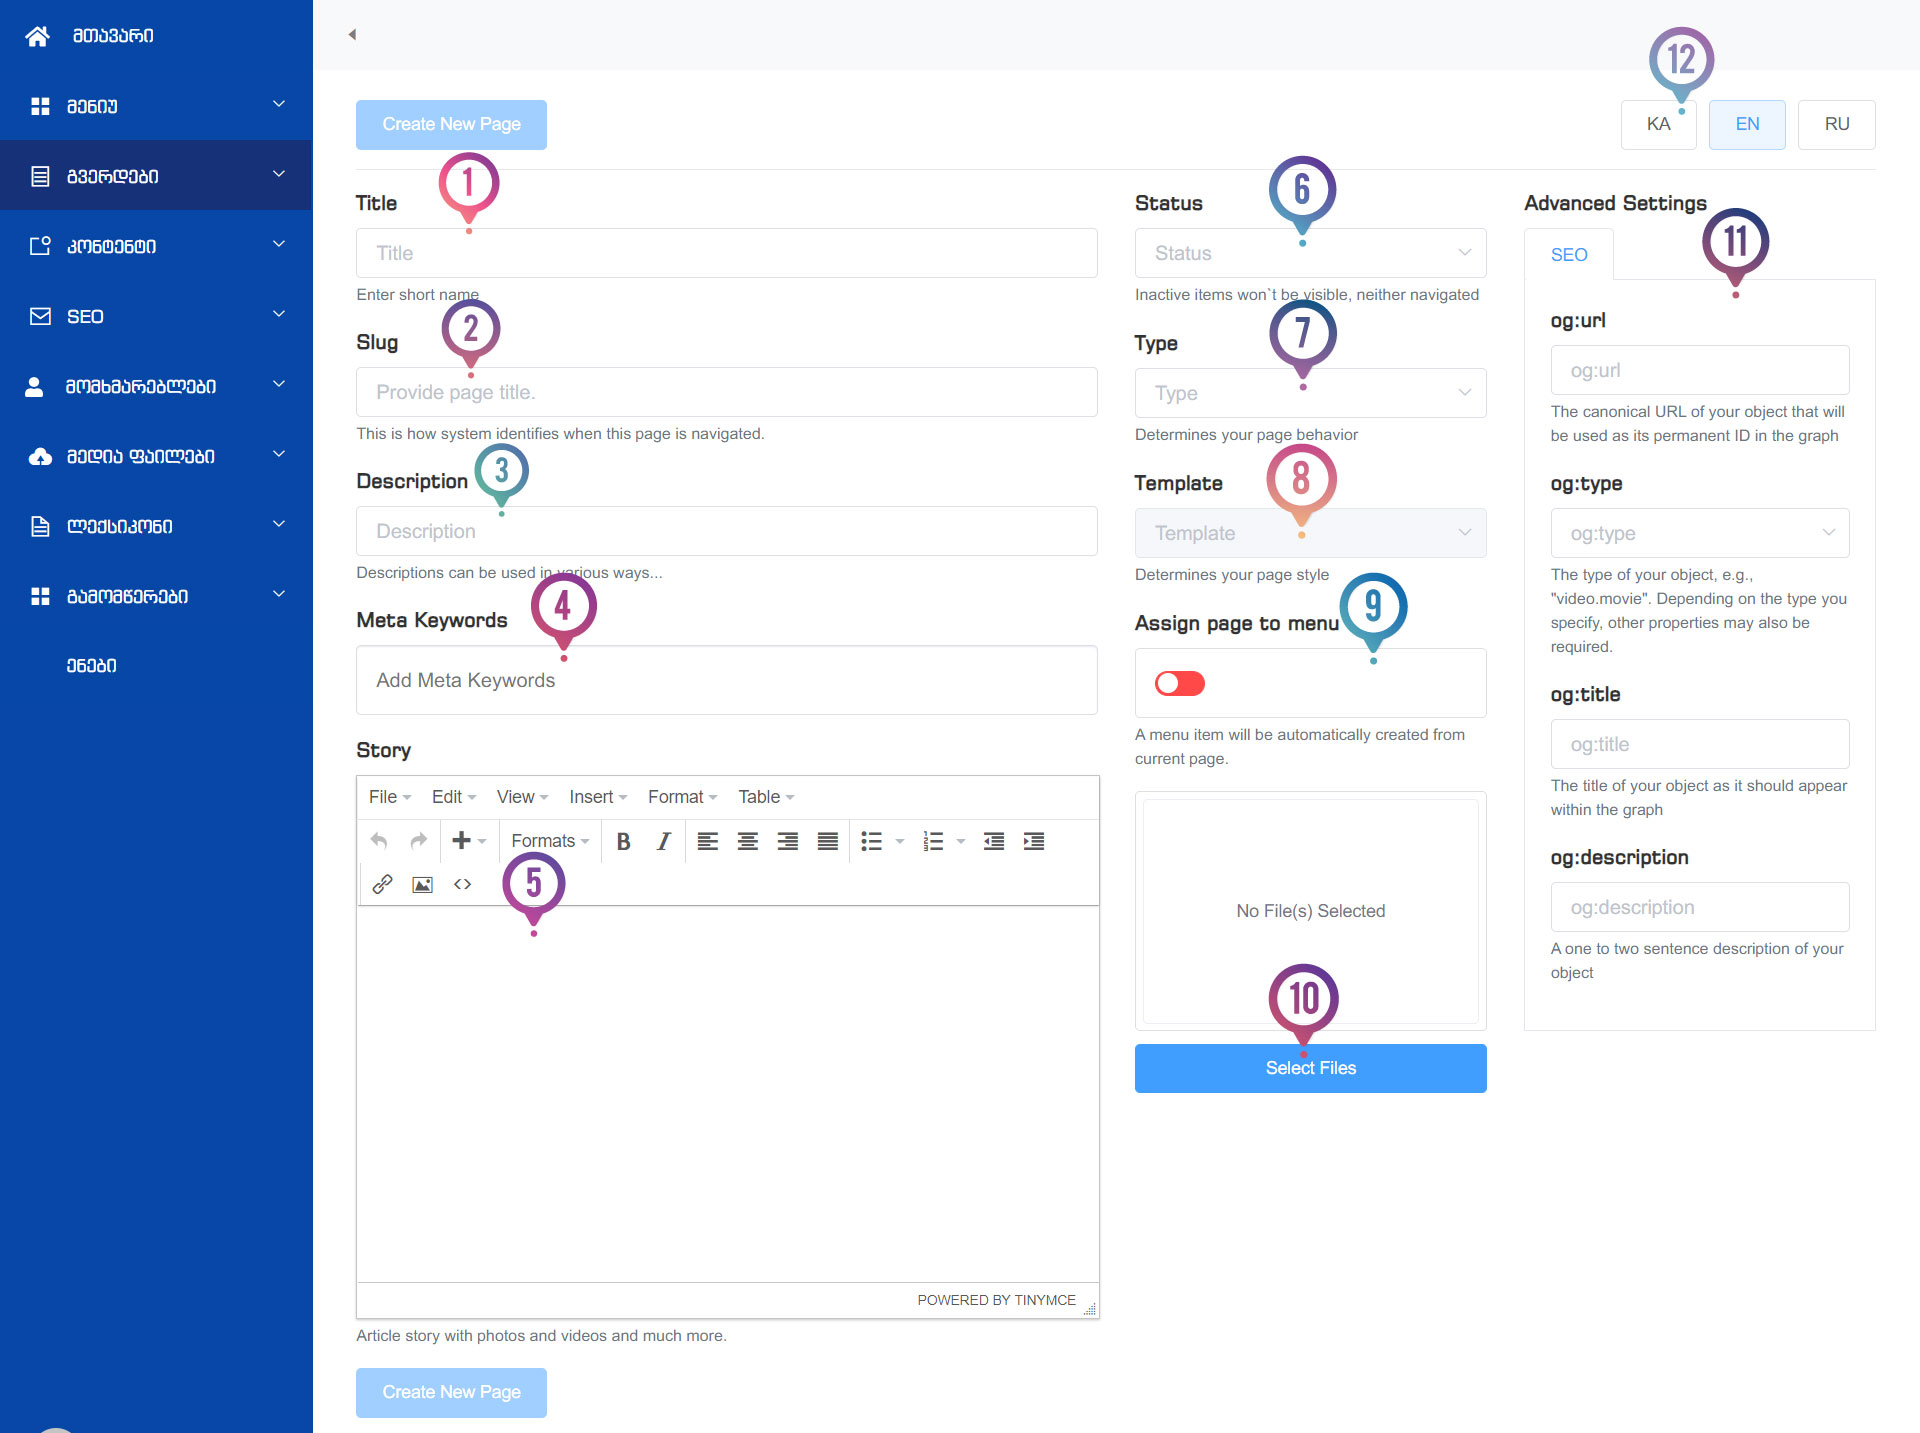
- Enter the name of the page, keeping in mind that you can create a separate menu and give it a different name.
- The slug is a link that is automatically entered, although you can of course edit it as desired.
- You write a short description that can be used in different places depending on your website design.
- Here you type keywords based on the content on the page, which will work on search engines and make you more easily searchable. You can separate words or phrases with commas or by pressing the Enter key on your keyboard.
- You can enter the appropriate content for this page, both text and photo or video material, depending on the specification of the page. However, in some cases, filling in the content is not mandatory, because if you are creating a news type page, for example, you do not write anything in this place because the news is added separately and is simply attached to this page. But if you are creating an About Us page, then of course text is required.
- You can set the status to publish the page or not.
- Here you choose what type of page you want to create, for example, news type, team type, contact, text type, etc. This list may be individual for every web page depending on the site design.
- Depending on the page type, you choose the appropriate design (Template). For example, the News page type may have 2 different visuals (depending on the site design), so when creating a page, you should choose what design the News page should have.
- If you want this page to be automatically added to the menu as soon as it is created, then toggle this switch. After that, you will no longer have to create a menu for this page, it will already be created and you will be able to move it to the desired location.
- Clicking on Select Files will open the photo uploader and a selection of previously uploaded photos, where you can assign one or more photos to the desired page, depending on the design.
- As with the menu, the Advanced Settings section on the left is entirely dedicated to search engine optimization and needs to be filled in correctly depending on the type of page you are creating.
- After adding a page or any content, you can change the language and translate the same page into another language. Depending on the structure of the site, this could be 2, 3 or more languages. In the case of any language, you can switch and translate the content.
News
You can add unlimite number of news and make edit them.
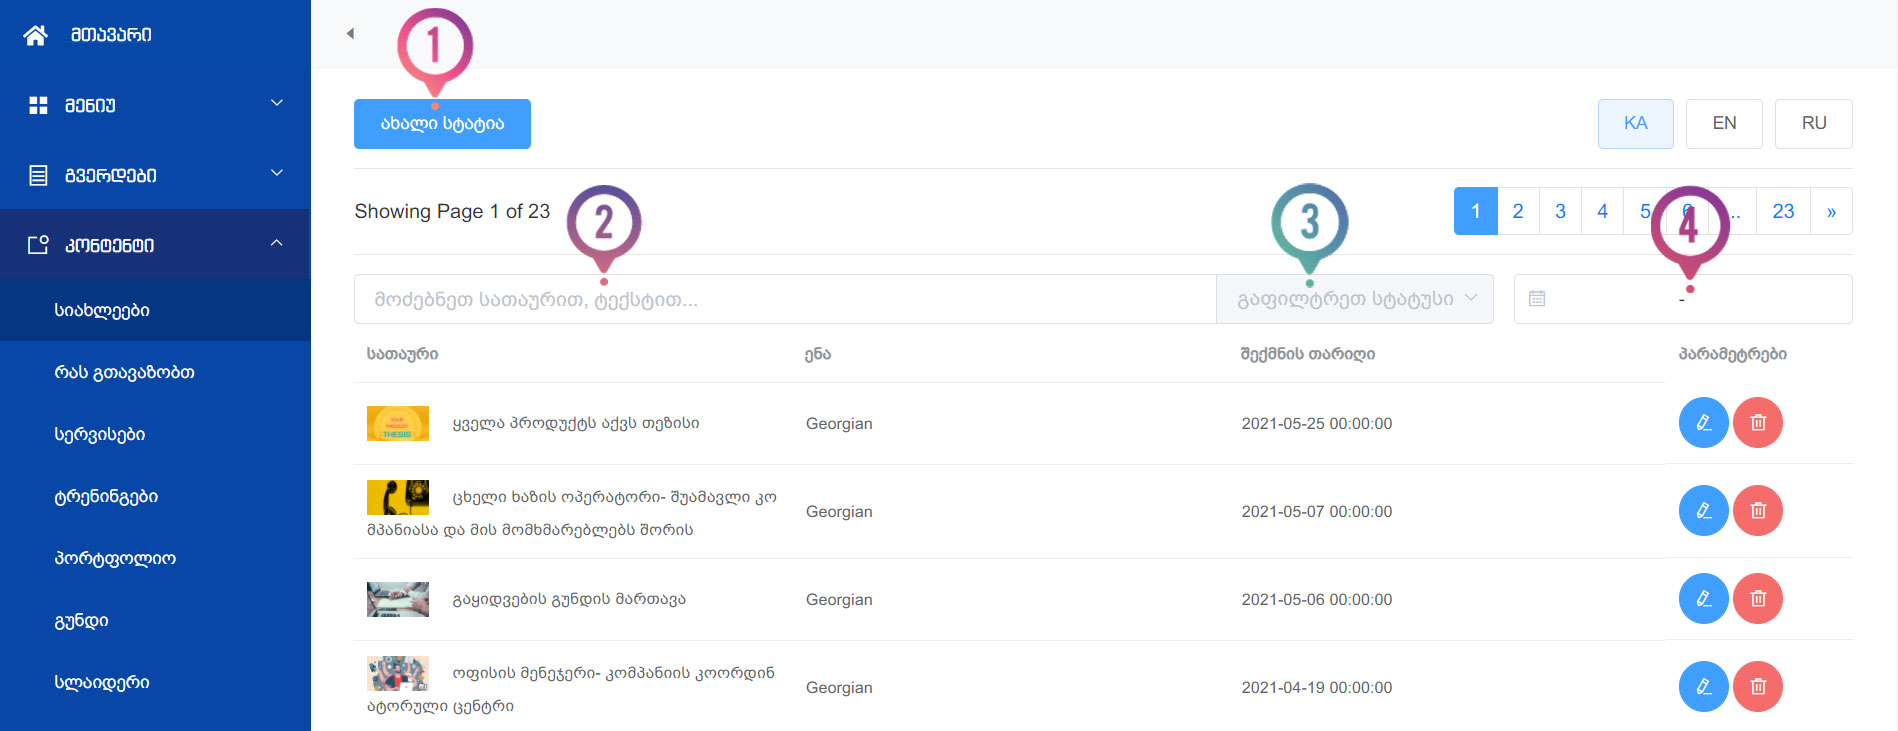
News management
- Add a news or blog (depends on site design)
- You can easily search for what you want in existing news by using the search term in the title.
- You can filter by status, for example, if you wrote something and it's inactive, this method will easily find the news so you can continue working on it.
- It is also possible to search for existing news by a specific date or interval. For example, articles from June 2, or from May 15 to June 2.
Add News
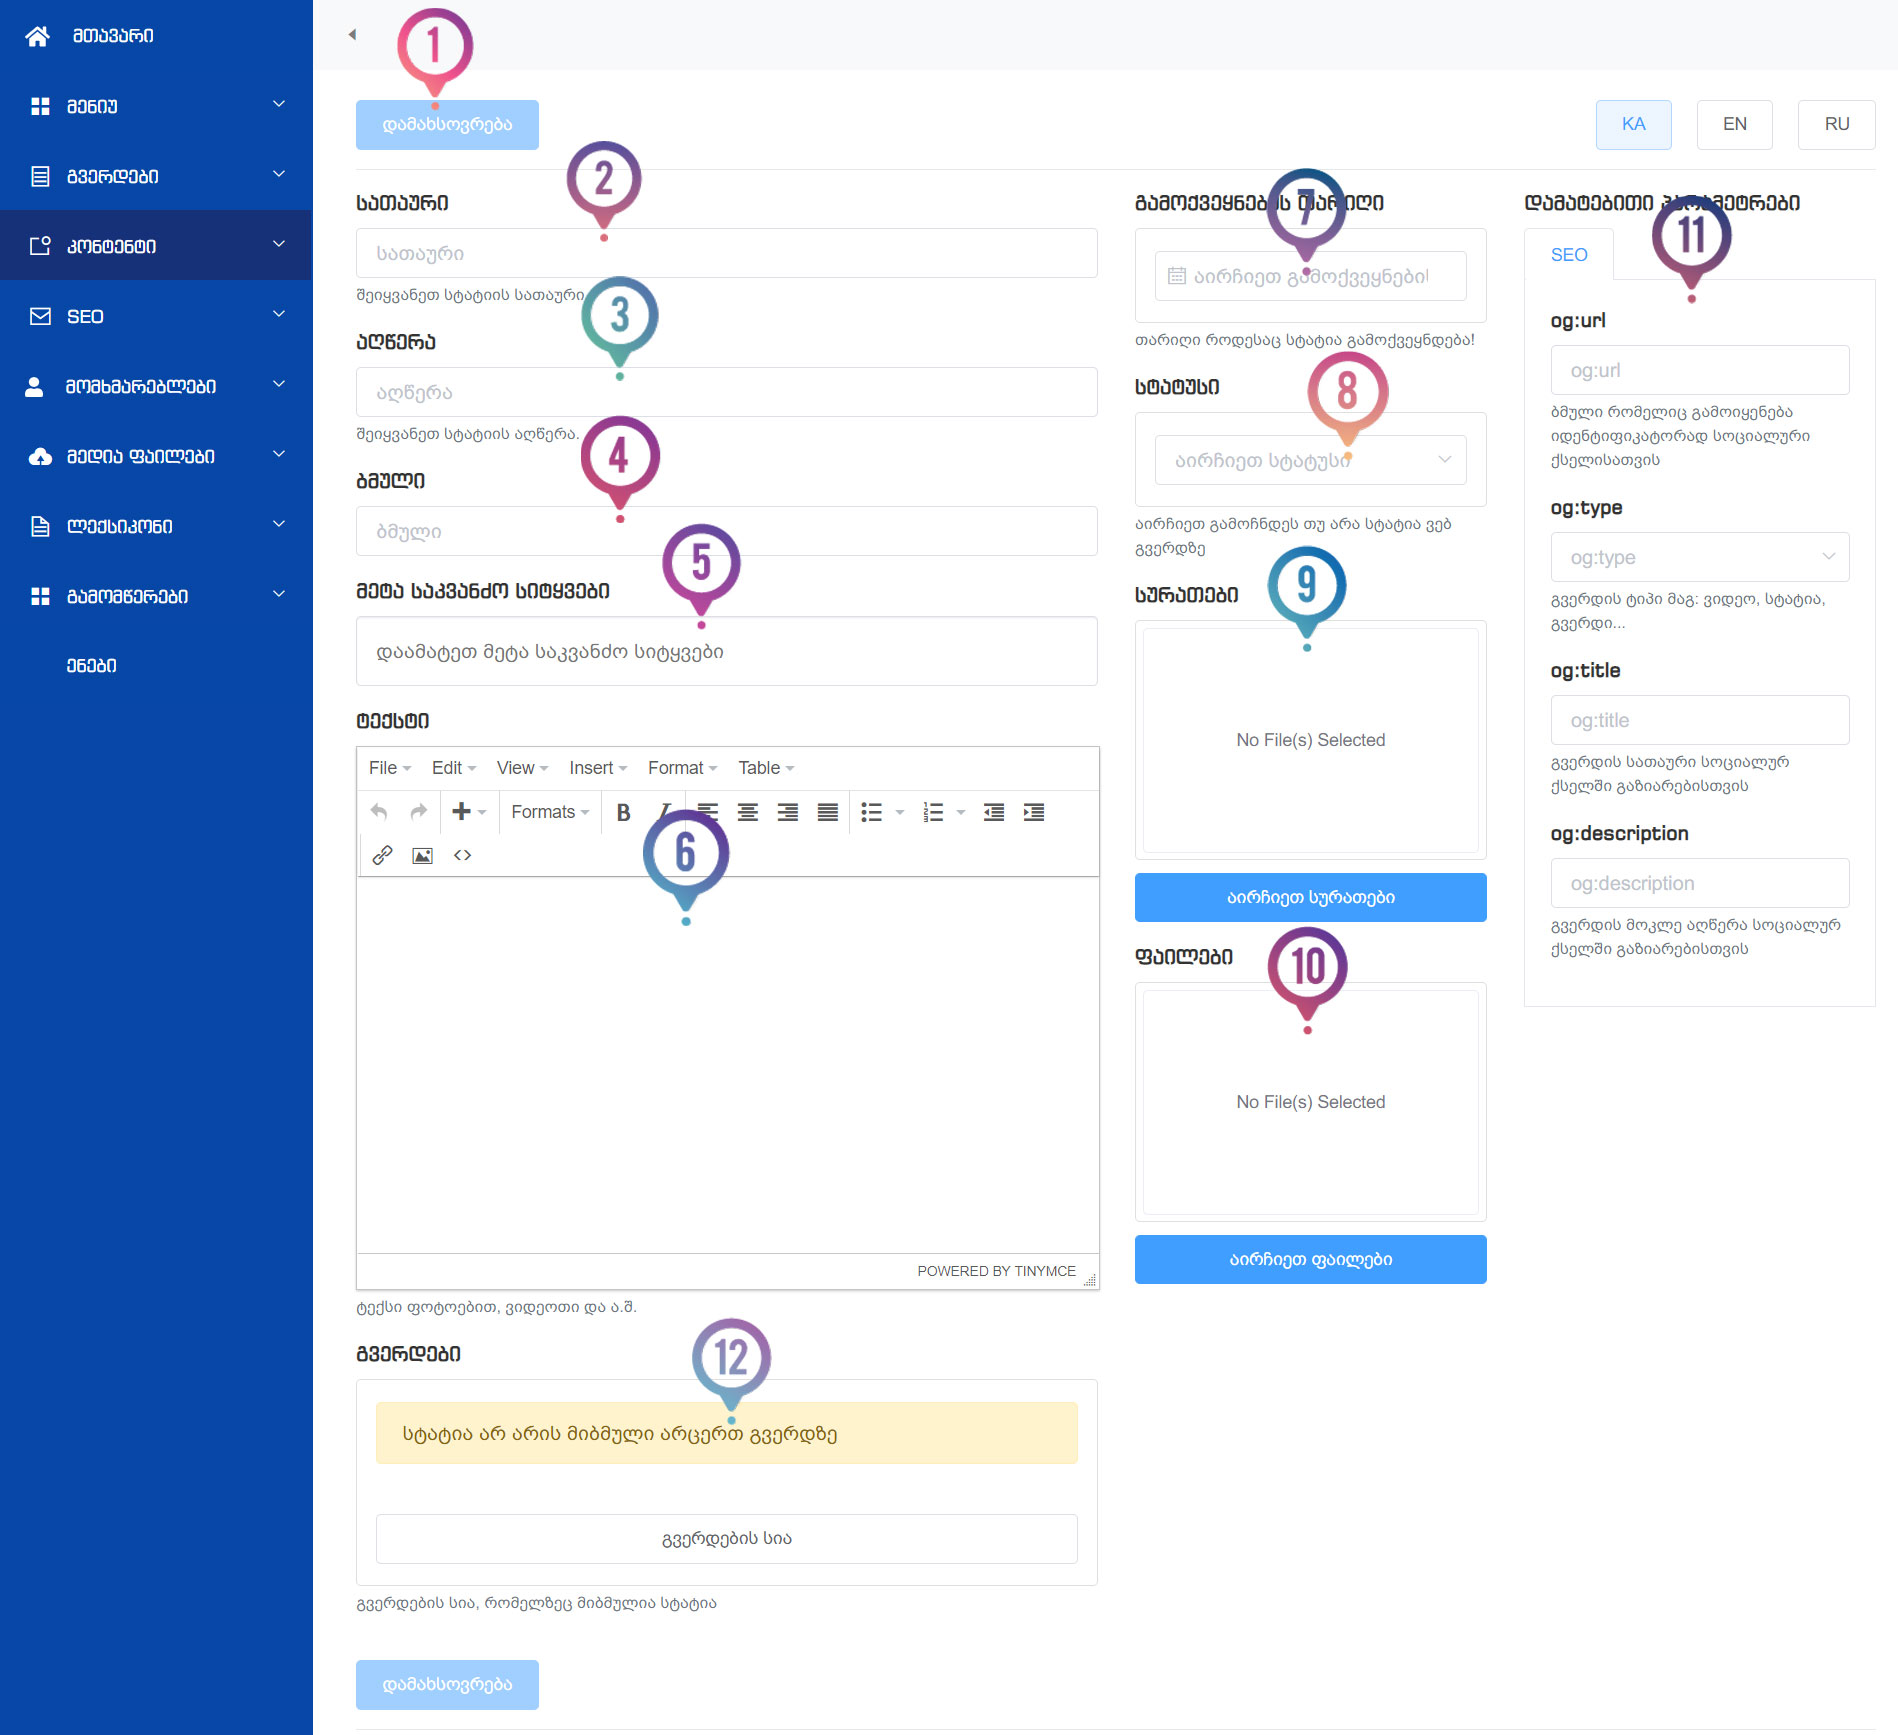
- After all required fields are filled, the Save button will become active and you will be able to save (add) the new information.
- Enter the news title
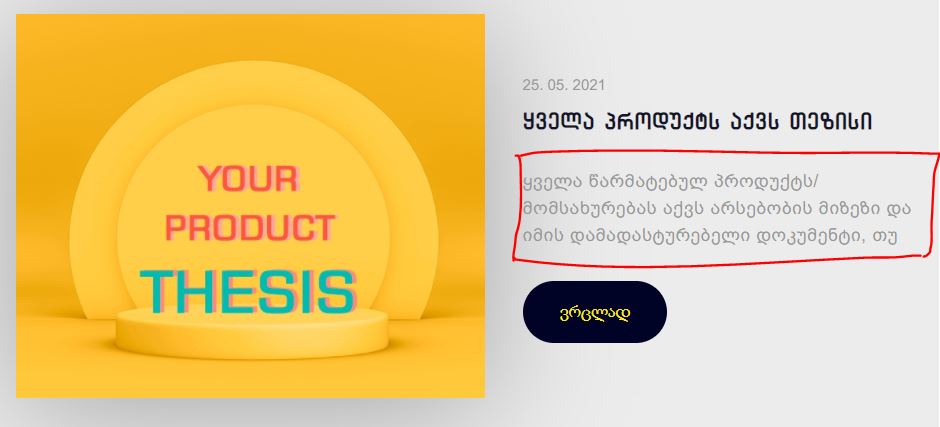
- Enter a short description of the news item, which can be used for various purposes (depending on the structure of your site). In most cases, this field is used to display a short description next to the photo on the news archive (List) page.
- The news link will be automatically entered based on the title, although of course it can be changed.
- Here you type keywords based on the content on the page, which will work on search engines and make you more easily searchable. You can separate words or phrases with commas or by pressing the Enter key on your keyboard.
- Here you can enter the full text of the news, use the editor functions and create tables, add photos or video material. Please note If you paste text copied from a Word document or another website into the text area, it is possible that the styles of the document or website (font, size, color, etc.) will be retained. Therefore, you must paste the text using the ctr+shift+V combination of these three keys or type the text into the website area. Otherwise, when copying text, select the entire text (ctrl+A) and use the Clean Formatting button to remove unnecessary styles to avoid problems later.
- Specify the date of publication of the news. This date will also allow you to sort the news in the desired order, as sorting is done by date. Depending on the design and structure of your site, the date may not be visually visible.
- Choose a news status, which can be temporarily inactive, say when you haven't finished writing, or you want to keep it private.
-
Upload a new photo or select from existing photos, please note that the news item may have 2 photos.:
1. Which is visible on the site, for this you specify Cover
2. The photo that will be taken when sharing, we choose Facebook Cover for this.
However, a Facebook Cover is not required; if you don't upload one, it will automatically use the same photo as the one shown on the site when sharing. - Depending on the design and structure of your site, this module may not be available to you. If the news item has an attached file (pdf, Word, Excel), it will be possible to attach a photo from this field using the same principle.
- As in all cases, the Advanced Settings section is entirely dedicated to search engine optimization, which you should fill in according to the content on the right side.
- To assign the content you have added to the appropriate page, you need to click on the Page List and select a page. There may be several pages here, for example, a blog, news, etc. This depends on the specifications of your site.
For Example:

Slides
Depending on the design and structure of your website, you may or may not have to add a slide, and the addition may vary slightly.

- After entering the information, click the Save button to save/apply the data.
- Enter a slider title, which may or may not appear visually on the site (depending on the site structure)
- If your slide has text, the content written in the description will appear in the appropriate place.
- Note the status, you can add a slide even if it is not active yet and not displayed on the site.
- Specify the date of addition, which will help you sort the sequence.
- Select or upload the photo that you want to appear on the slide.
Text This field is individual, for example in the case of Lemons it is required because in addition to the title we have 2 descriptions.

Link Depending on the structure and design of the site, it is possible to add another field where you specify the desired link, in case it is necessary to go to the desired page by clicking on the slide or clicking on the button on the slide.
Team
If your website has an employees section, it can be managed from there.
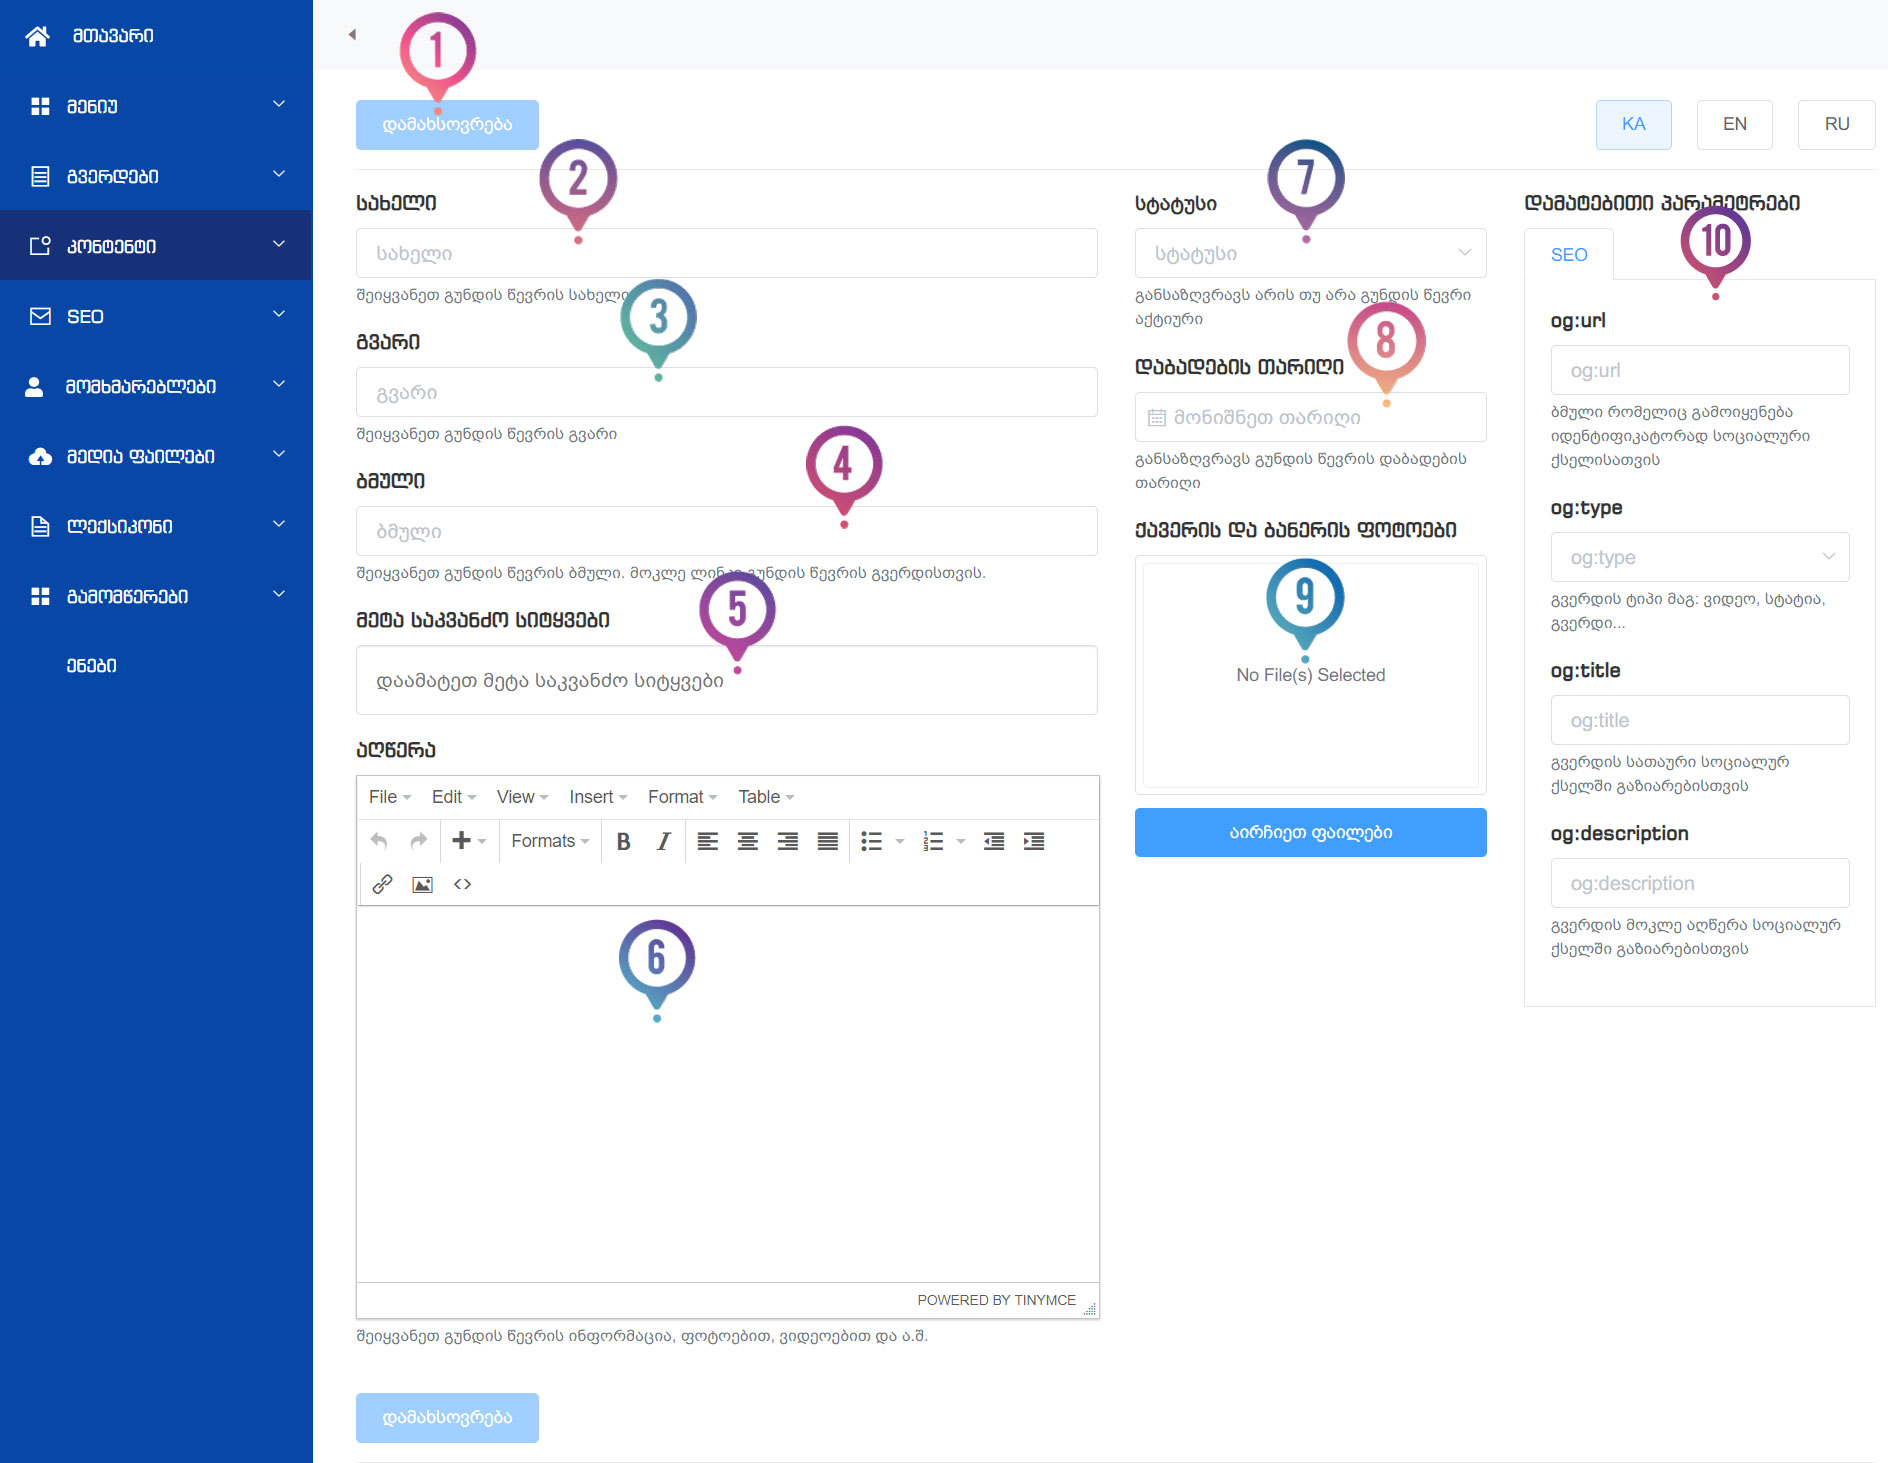
Add / Edit
- After entering the information, click the Save button to save the data.
- Enter the employee's name
- Enter the employee's last name
- The link, as in any other case, will be automatically filled in and you can edit it
- Enter keywords for search engine optimization. Separate words and phrases with commas or press Enter on your keyboard
- Enter information about the employee, biography, or other information
- Mark the status, you can add it but keep it inactive for now and activate it at the desired time
- In our case, the birth date is specified, but in other cases it may be add date, which will allow you to add in the desired order.
- Upload or select from existing photos
- Additional parameters are entirely dedicated to search engine optimization and should be filled in to match the content entered on the right side.
- Fill Position
- Upload File (CV)
- Enter contact information (email, phone, social networks)
Additional features
The team section that flows from your website structure may include additional functionality, such as:and etc.
Contact
From the control panel, you can manage the information, map, and logos on the contact page.
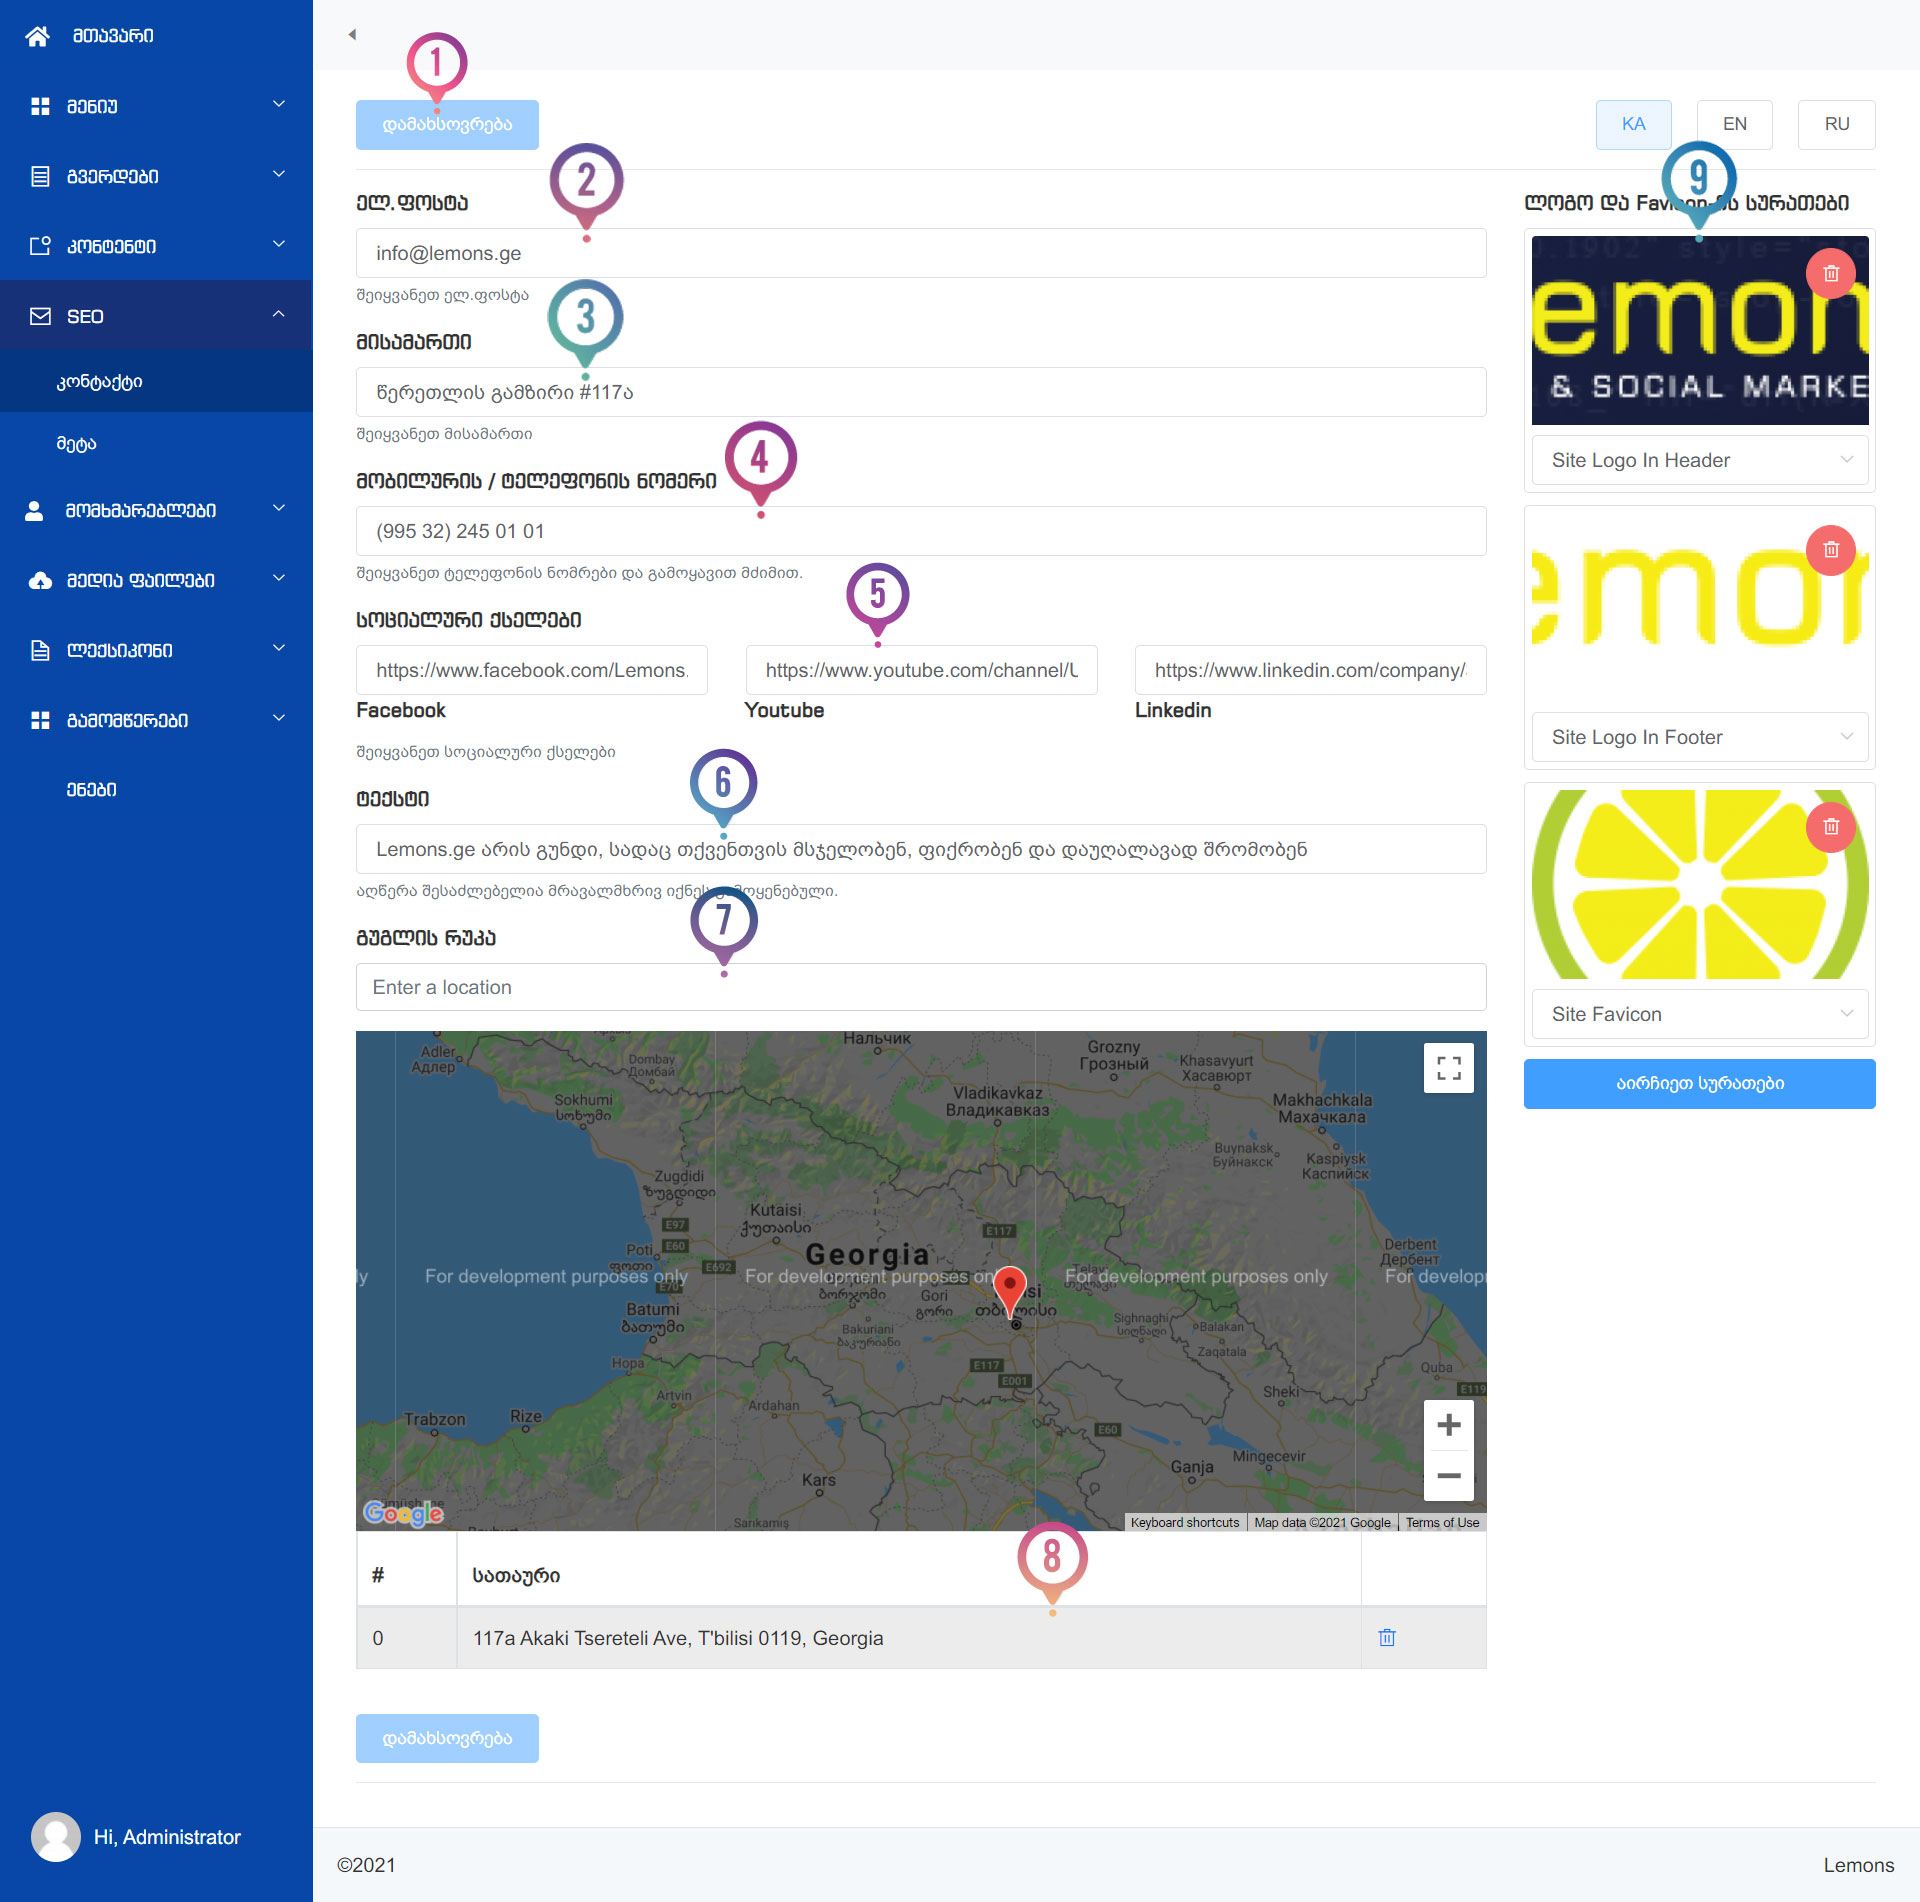
Please note that the fields may vary depending on your business process. However, the principle of displaying information is the same for everyone.
- After changing any information, click the Save button
- Enter the email address to which the information sent from the site's contact page will be sent. This email can also appear as information on the contact page. However, upon request, another email address can be entered on the site and the letter from the contact form can be sent to another email address. (Separate these two emails)
- You write the office address, which will also appear on the website as information.
- You are writing a phone numbers.
- Enter the links to social networks that your company has. Their number is determined in advance when writing the technical task. Accordingly, in the control panel there will be a corresponding field for all social networks..
- It is possible that similar information could be used on your website, depending on the design and structure. In this case, the information entered here would appear at the bottom of the site, below the logo.
- You write the address of your office, which will be found on Google Maps. When searching, relevant results will be displayed, you select the exact address and then a Pin (location marker) will be automatically placed on the address. It is possible to add several addresses (branches) depending on the design and structure of your website.
- Delete added address(es)
- We upload or select a site logo from existing files, there may be 2 logos to choose from, depending on the design in different colors. I also upload a Favicon here, a small photo of the browser tab. In many cases, there may also be an option to change any banner here, depending on the design of your site. For example, if there is an image as a background on any page.

Meta (SEO)

- If you change (add) any information, click the save button..
- What should be written as the title of the site when a user searches for information in a search engine and is suggested to your site? This information is also written in the browser tab of the web page.
- What should be written in the site description when a user searches for information in a search engine and is suggested to your site?
- You should write down keywords that your potential customers might use to search for relevant information. Separate words or phrases with commas.
- To manage Facebook comments and shares, you need to create a Facebook application, the ID of which you can enter here.

Media Files
In addition to the fact that you can upload and select the desired photo or file when adding each news or page, it is also possible to upload/sort/delete these files in a separate section.

- A search field where you can enter the name of the desired photo or file and search for the one you want from the already uploaded material.
- By clicking the button, you can filter by folders, as well as create and organize files into desired folders.
-
Clicking on the button will open a window where you can select one or more files from your computer and upload them to the server. After selecting the file or files, click the Start Upload button and wait until all files are uploaded.
If any file is large (over 2MB), the server may not be able to upload it. Keep in mind that such files and photos will overload your site and therefore load slowly. Therefore, upload materials with the lowest possible weight.

- By clicking the button, you can view your folders and go to the desired one, and you can also create a new folder.
-
 By clicking on the button, you will see detailed information about the photo, and you will also be able to delete the photo, only if this photo is not used in any page or news. If so, you will be warned when deleting it.
Dictionary
From the control panel, you can change any word that exists on the site but you did not create as content, any button or placeholder text, in any language on the site.

- It is possible to add a new word from the control panel, however, it is impossible to display it on the site without the intervention of a developer, because the code cannot perceive the corresponding text without inserting a special abbreviation into the code. Therefore, without a developer, it is only possible to edit and translate existing words.
- Only 10 words are visible on the first page, but you can scroll down to the next page and change any word on the site.
- When editing, we only change the content in the "Title" field and do not touch the "Word" field, as this is an abbreviation by which words are identified.
- To change or translate words, click the "Edit" button.
Subscribers
If your website has a subscription feature, subscriber information will be stored on this page. You can also download this data via Excel and use it to send other information to other platforms.

Languages
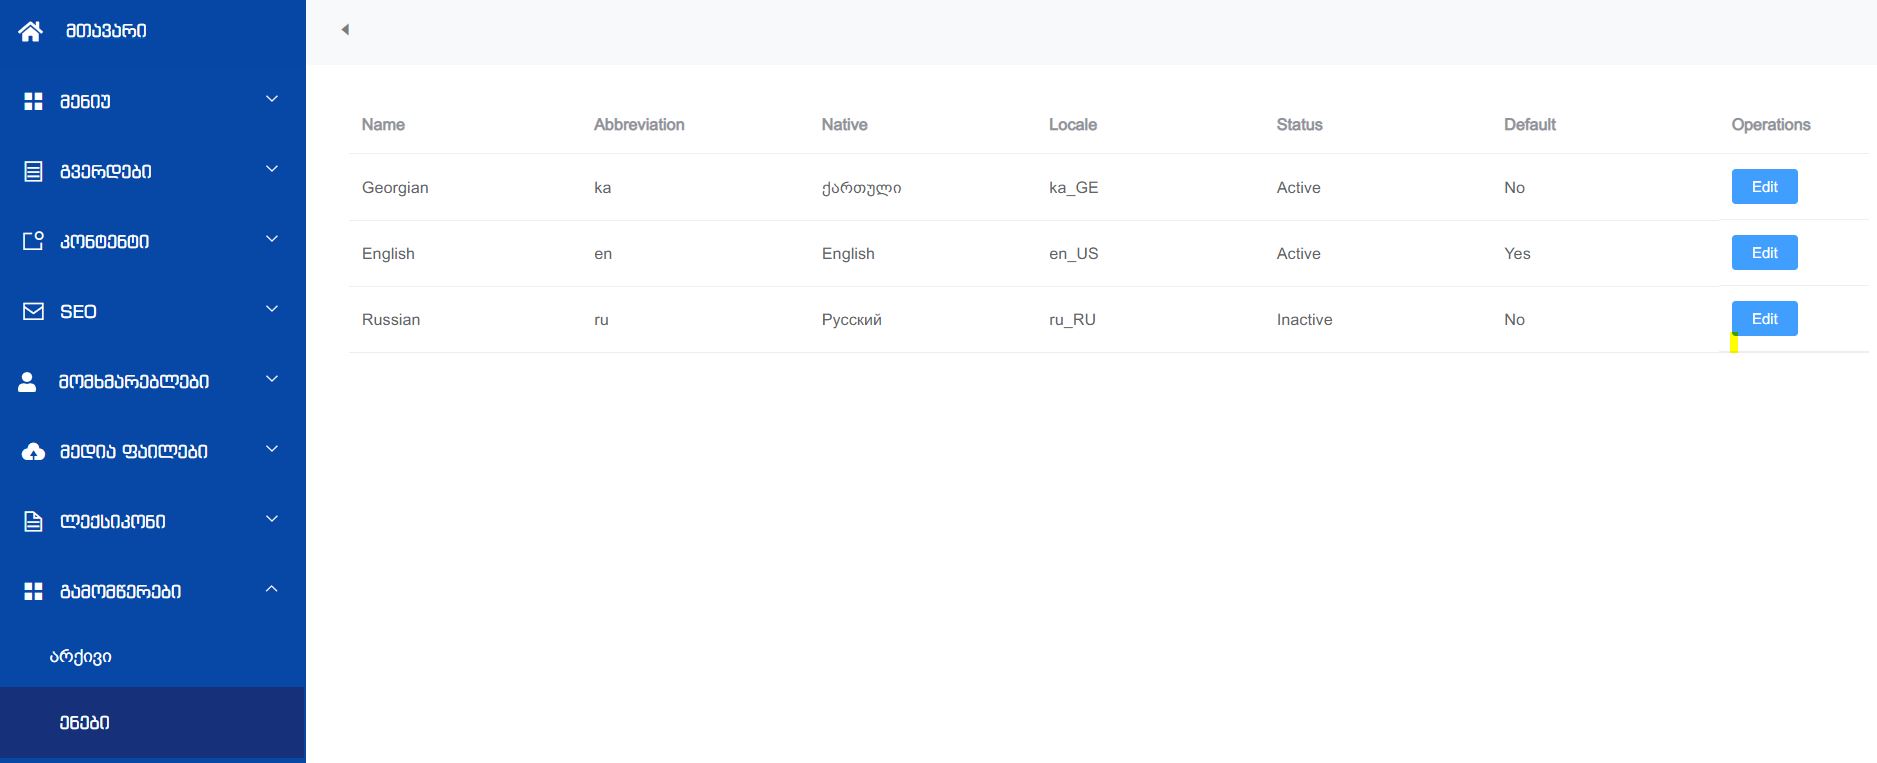
In this section, by editing (EDIT) you have the opportunity to disable or enable the desired language from the languagesavailable on the site. You can also change the default language. For example, if when entering the site, the user is loaded in Georgian and you want it to open in English, for this, in the edit, you set English to Yes and Georgian to No.
მადლობა
Thank you for working with us. We are always trying to make website management easier. If you have any questions, please contact your project manager or email us info @ lemons.ge
best Wishis
Lemons Team
